Sunday, December 30, 2012

Idea of the Day + Potty Training Update

We started potty training Saturday.  Bear did not wear clothes ALL DAY because we didnt have to go anywhere.  He used the potty 5 times and had 5 accidents.  One accident was because he wasn't really sure what to do about poop and the others were because I put "big boy" pants on him before he was ready and he didnt really understand that they didn't work like diapers.

Today (Sunday) we did MUCH better.  He wore a diaper last night and for nap today and went pants-less the rest of the day with NO accidents until right before bed (he got distracted). Hooray! Unfortunately I don't have tomorrow off so I am hoping he can go most of the day in big boy pants.  We shall see!

I did NOT do any "rewards" system as some have recommended and like I had originally planned for two reasons; firstly, the rewards (stickers, snacks, etc) have only caused issues, meltdowns and stress in the past and secondly, I had an internal battle with myself on whether or now thats how I really want to train him, I don't want him to expect rewards, especially since he will be at school or with Nana for other parts of this process.

By day two I, as a parent, learned that sticking with it is KEY! I was afraid I would give in and give him pants but after telling him he doesn't need them only twice, he gave up and went with it only to improve the following day.  This was a GREAT bonding weekend, because I had to be 100% focused on Bear and constantly asking him if he had to use the potty we came up with great indoor games and got lots of cleaning done together. He actually HELPED pick up his toys!

During a watercolor excursion we decided to face paint.  I wanted to share this one specifically because it is something you and your kids can do together any day at any time - only takes water and non-toxic watercolors (most are) and a paintbrush or two.  Also really great that is washes right off and it's not somehting your child gets to do alot.  We first did a hungry caterpillar on his cheek which changed into a "war paint" of sorts on the other side, arms and belly.  Threw him in the tub and  - all gone!


Love,
PlusPeace

Thursday, December 27, 2012

Snowy Day & Recipes

Just a plain post today.  It's finally snowy here and Bear is thrilled (me not so much).  I am looking forward to some hot cocoa and maybe a stew for dinner.  I just wanted to share this super quick family favorite that only takes about 30 minutes cook time and about 10 prep.

Poppy's Quick-Stew

Ingredients:
1 Onion - whatever you have pearl onions work too
10 Little red potatoes - the kind that come in a bag
1 bag frozen broccoli
1 large tomato
2 Carrots (OR handfull of baby carrots)
1 lb Cube Steak
Beef Bullion - we use the better than bouillon low sodium paste
1/2 Cup Flour
Pepper
2 Bay leaves
Rosemary
Thyme
Dill
Olive Oil
1 tbs Butter
2 Cups hot water

How to:
Cut the potatoes into even 1 inch cubes, chop onion into bite size pieces as well as carrots. Set aside.

In a shallow dish combine 1/2 cup flour, 1 tbs rosemary, 1 tsp thyme and a few grinds of pepper.  Mix together and remove 2 tbs of mixeture to set aside.  Coat both sides of the cube steak.  In a large skillet, put 1 tbs butter and 2 tbs olive oil on medium heat.  Once sizzling, add cube steak and brown both sides. Toss the cut vegetables and bag of frozen broccoli and 2 bay leaves on top and add 2 cups of hot water and 1 bullion cube.  Cover and bring to boil.

In the bowl with your flour mixture add 2 tbs cold water and whisk until mixed in. Pour slowly into the skillet while mixing.  Let simmer on medium heat until sauce thickens.  If the sauce is not getting thick, add more flour/cold water mixture.

Slice tomatoes thin and put on top of the stew and sprinkle with dill.  Let cook covered until tomatoes are hot.  Remove bay leaves and serve.

I like to make biscuits to go with this but it is a perfect quick meal that tastes like it came from a crock pot - yum!

Love,
PlusPeace


Ebates Coupons and Cash Back

Wednesday, December 26, 2012

Potty Training...

Well, I think it's time for Bear to start using the potty...for real this time.  He took a nap at Nana's and she found him in a puddle with no pants on in bed and a clean diaper on the floor of the bathroom and pee on the potty seat.  I am SUPER proud of him for trying to use the potty all on his own but sad that I haven't even really tried to potty train.  We were doing really well for a while and then he lost interest.

I think it's best for all involved to just jump in and take the "24 hour" method head on!  And I figure just after Christmas is the PERFECT time, it's snowy so we wont be going out and we have tons of new and exciting toys to play with.  Unfortunately, stickers dont work out for Bear.  I was letting him choose one sticker after using the potty but then it would turn into a meltdown because he either wanted more or chose the "wrong" one and wanted to pick a different one.

Here is the Saturday game plan...

Mommy gets up and goes to get her morning coffee.
Daddy goes to work.
Mommy and Bear spend the day doing a bunch of activities around the house including but not limited to:
Play Cowboys
Make Cookies
Go on a treasure hunt
Playdough
Painting Craft
New Movie
Pack up the ornaments
NAP
Read new books
Wikki Sticks
Special Lunch/Snack
Dance Party

I'll have to figure out the whole "prize" system since I don't think I'll be able to let him choose.  Maybe throw all the "pee" prizes in one bag and let him put his hand in and pull one out rather than letting him see what he chooses and another for "poo" prizes.

I figure we'll set a timer for 15 minutes and try to go potty every 15 minutes.  I am not supposed to put a diaper on him ever again after this so we'll see how it goes!!

Wish me luck,
PlusPeace

Can anyone offer advice?

Sunday, December 23, 2012

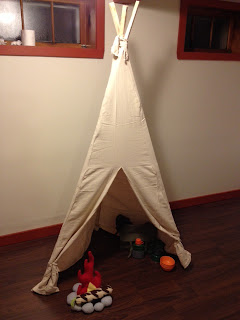
The Two Hour Teepee Tutorial - DIY

I do most things last minute, especially this Christmas! Bear has had a lingering cold since early November.  He spiked a fever on Tuesday and I took him to emergency walk in clinic to see what was up.  They told me he was just "catching the same cold over and over", which left me feeling uneasy since he had a fever and green boogies ((infection).  I called my pediatrician on Thursday because he was so sick he couldn't even play and we went in on Friday morning to find out he has an ear infection, strep throat AND viral pneumonia. He's been on antibiotics for three days now and is back to himself! YAY!

Anyways - I have been planning on making Bear a teepee for Christmas since we moved into our new house in October.  I put it off until this morning - yes, less than 48 hours before Christmas.  Everything cost me less than $13 and only took a 2 hour assembly.

After much research online (well pinterest) it looked like most people had this as a "center piece" for a room.  We (like most) just dont have that kind of space to dedicate so this is made to fit into a corner but the directions can be altered to accommodate a larger teepee.  Mine also collapses VERY EASILY to fit into a corner and sets up again just as easy.

Supplies:
1 - 6 x 9 Canvas Drop Cloth - $10 Home Depot
2 - 1" x 3" x 8' Strapping - $1.34 each Home Depot
Good cutting scissors
Sewing Machine
Thread (I used what was in the sewing box - half is sewn in orange, half in red)
Tape measure
Straight edge (you can use the strapping)
Pencil
Table saw - OR have one of the lads at Home Depot cut it or you

How To:
Step 1 (Strapping)

Cut the strapping the long way so your pieces are now 1" x 1.5" x 8'  I wanted my teepee only 6' tall so I just the strapping again to be roughly 6'  To looks a little more realistic they are all a few inches off.  This way the top sticks are uneven.

Step 2 (Canvas)

A - Lay out your canvas. It will be wrinkly, if you want your teepee perfect then iron it first, I was not about to spend 30 minutes ironing a 6 x 9 piece of canvas.


B - Mark the center of the canvas on the top and bottom.
C - Measure 3' from each end and mark again.
D - Using your straight edge or a piece of strapping put one end at the center mark and the other at one of the 3' marks and draw your first angle
E - Using the center mark make your second angle in the other direction.
F - On the opposite end from your point, use your edge to go from the 3' mark to 3' mark and do the same on the opposite side
You should now have three triangle, the center one going to opposite direction from the other two.
G - Cut along your lines (4 cuts total)


Step 3 (Straps)

A - Using one of the extra edge pieces, cut out 9 8" x 4" pieces of canvas.  These will be used to hold the wood strapping to your canvas.
B - Fold in both sides 1/2" (length wise see below) and stitch


C - Do this for all 9 straps

Step 4 (Sewing your tent)

A - Pin all of your triangles together leaving 1" to sew. 
B - fold your straps in half and tuck into the seams about 2' apart, you will want one at the bottom one half way and one 6-8" from the top
C - Pin them in place (unfortunately I dont have a picture of all my pins but you can reference the image of the straps sewn in place)
D - Sew along where your pins are leaving 1/2 - 1" from the edge
Note: Leave about 4" unsewn from the top (narrow end of teepee) to allow room for the sticks
E - Do this for all 3 sides


Step 5 (Finishing up)

A - Turn your tent right side out (so the straps are inside)
B - Run your strapping though the loops (work from the wide end)
This step can be a bit frustrating since it gets all tangles up but go slowly and dont worry about imperfections
C - Cut a long 2.5' piece of canvas to tie the top of your teepee in place.
D - Pinch small 1/8" holes in to top of each triangle
E - Stand up your teepee and run the long piece of canvas through the holes and wrap it around the wood strapping until it holds and tie tightly.
D - Cut a slit in the center on one of the triangles until you are happy with the size of the door.


DONE!
You can decorate with paint or ribbon or other kinds of fabric.  I left mine very simple.  For tiebacks on the door i just used more canvas but think ribbon would look nice.  Please leave questions in the comments section if you have any!!


To store it, just grab it from the top and it collapses to fit in the corner like so...


Setup after the initial frustrating trying to tie it part is very easy!  The whole process with no directions took me about 2 hours (during Bear's nap).  The shape of this (triangle base) is made to fit into a corner but if you use the same directions and make more triangles to sew together, you can use more poles and have a larger teepee

Best of luck and Merry Christmas!

PlusPeace


Wednesday, December 19, 2012

Custom Wrapping Paper - 8 Bit Dinos

I made this super awesome wrapping paper for Bear at work and had a bunch of fun wrapping some gifts last night - check it out!


Also I found a great Men's gift for Tim for Christmas.  I am not sure if it will arrive in time but I got him a subscription to DollarShaveClub So he gets razors every month (I did the math and this is much cheaper) Be careful, you DO have to cancel or you get billed monthly.  Our plan is to do a few months and then we'll have enough to last (6 blade razors).  Also you get $1 cash back for going through Ebates!

I hope he loves it!!

PlusPeace

Monday, December 17, 2012

Advent Calendar: Day 15

So Advent Day # 15 was another fantastic one - while Mommy and Daddy had a night on the town and attended a few Christmas parties, Bear and Nana went on the Polar Express!!


We watched the movie twice before he went and he had so much fun drinking coco, riding the train and seeing Santa! He even held the bell up to his ear and repeatedly said "I believe!"


I was sad I didn't get to go but very happy he had a great time :)

Love,
PlusPeace

Don't forget Ebates for your last minute shopping!! My next check will be $53 (Just use my button below)

Ebates Coupons and Cash Back

Monday, December 10, 2012

Advent Calendar & Christmas Learning

I have to admit  I am totally against the "Elf on the Shelf" thing.  I remember a moment when I was about 3 or 4 and I went snooping around for Christmas presents only to get really freaked out because I thought that because I was naughty and went looking around for presents, Santa wouldn't give me anything for Christmas.  As far as I understand the Elf from Elf on the Shelf is there to watch your kids 24/7 and report back to Santa who is being naughty or nice, instilling a fear of constantly being watched.  I also don't agree with the Elf being able to be naughty or mischievous.

I read an article in Parenting magazine recently on why you should let your kids break the rules (once in a while) and did some serious parent soul searching on what my views are on Christmas and introducing Santa into our traditions.

I don't want Bear to have a moment of panic somewhere down the line when he is scared he will be forgotten on Christmas for being naughty.  I found an episode of Mr. Rogers where Daniel Tiger is afraid that Santa watches him while he's sleeping and Santa comes to the neighborhood and Elaina tells him to confront Santa with his fear.  Santa tells him what he is not watching while he's sleeping but he is in all of us and is the spirit of Christmas.  One of Mr Rogers' friends also sings a great song with the line "Sometimes even good people do bad things" and make mistakes.  I like that, it's telling my child that even though he may make a bad decision now and again, that doesn't label him as naughty or bad.

Even thought Bear is only 2.5 and he doesn't always understand  he was a little fearful of Santa until after we watched the episode.  Now he is actually excited to go meet him!

There you have it, my view on Santa!

For more advent fun:
Day 4: Open up a new Christmas book. I chose "Bear stays up for Christmas"
Day 5: Make coco.
Day 6: Choose a Special Treat. AKA leftover Halloween candy
Day 7: Make ornaments with Mommy

and....drum roll...day eight...


Sesame Street Live!!! I highly recommend this, it was tons of fun! We were center to the stage in the third row of the floor seats! So great, Bear was nervous at first but got very into it in the middle.  Just be prepared to buy a $15 toy just because EVERY other little boy has one.

Love,
PlusPeace

Sunday, December 2, 2012

Advent Calendar 2012

I decided I was bored with the usual advent calendar you get at the Christmas Tree Shop or rite aid so we decided to instead do something special each day!  I thought of 25 things ranging from traditions we already have like decorating the tree and opening Christmas jammies on Christmas Eve to new ones like special holiday books and donating toys we no longer play.   I lucked out, some days end up being REALLY awesome for Bear because I was able to include December events we've had planned for a long time like Sesame St LIVE (Thank you Rickie and Katherine) and the Polar Express with Nana.

Anyways, I printed them on cards and put them in envelopes.  Since Bear can't read yet, I've been putting them with what the activity will be.  Here is where we are so far...


Love,
PlusPeace

Edited 12.3.12 to add:  For the Cinnamon Ornaments (I made these as a kid) I didn't want to buy 1 cup of cinnamon so we used 1 2 oz jar of cinnamon and 6 oz of flour (to make 1 cup) mixed with 1/2 cup elmers school glue and 1/4 cup applesauce.  Mix until doughy and add more flour/cinnamon until it is a workable consistency.  Roll out the dough and cut the shapes with cookie cutters.  We used a straw to cut the holes for hanging.  Lay out on a pan and parchment paper and store for 24 hours in a dry climate.  Once hard, string and hang!