Showing posts with label DIY. Show all posts

Tuesday, July 8, 2014

Tasty Tuesday Recipe!

We are all about cool treats on summer weekends but not so cool with food dyes and additives.  Try out this easy summer treat that's sure to please!


1/2 Cup Frozen or Fresh Berries (make sure they are ripe and sweet)
1 Cup Plain Kefir
2 Cups Vanilla Yogurt

Freeze the vanilla yogurt for 2 hours or until frozen.  Put it into a blander or food processor with frozen berries and kefir.  Blend until smooth.  If you find that it's too tart for your liking add in some agave or honey. You can also get creative and sub the berries for bananas, peaches or pineapple. Yum!

Enjoy!

This is also really good if you spoon into pop molds and re-freeze for a treat later.

PlusPeace

Wednesday, October 2, 2013

Solar Powered Pumpkin Jars - DIY

Thank you, Nana for this amazing craft!  My mom and Bear made these cute pumpkin lights (powered by solar garden lights) and I just had to share


You will need:

Paintbrushes (preferably with long handles)
Various glass jars (jelly jars, pastene jars, canning jars, etc)
Acrylic paint – think pumpkin and fall colors: Orange, Red, Brown, Yellow
Sticky-back Black Foam
Solar Garden Lights – Try Target, Walmart or clearance sales at HomeDepot for cheap
Electrical Tape
Scissors

How To:

Put a dime sized blob of 1-2 colors of paint inside each jar and let your little ones use the brushes to coat the inside of the jars.  Cut out eyes, nose and mouth shapes from the stick back foam.  You can also do spiders, shapes or anything your imagination can come up with.  Stick them to the outside of the jars.

While the paint dries, remove the sticks from the solar garden lights and use the electrical tape to put the light up parts onto the top of each jar.  Make sure you pull the tape tight so they stay in place.  If you use mason jars, remove the lid inserts and tape the lights to the rings). 

Leave them in the sun and watch them glow at night!!


If you have trouble finding solar lights use the battery operated votive candles (Target, Walmart, craft stores and some dollar stores)

Love,
PlusPeace

Monday, April 8, 2013

Pom Poms - Kid Craft

We made super cut pompom monsters caterpillars this weekend.  I ran into AC Moore to grab some eyes for Monster Minibets and saw a big bag of neon pom-poms on sale for $1.99 and we have craft foam and googly eyes at home.


You Need:
Tacky Glue (or elmers)
Googly Eyes
Pom Poms
Craft Foam

For Caterpillars you need a needle and thread as well.

The feet are just hearts I cut out.  I left Bear assemble them and I did the glue dabbing. For the caterpillar just use a needle the thread the pom poms in a line, when it is as long as desired run the thread through the opposite direction and tie the ends (they make nice antennae)


Good craft for before dinner - they are done drying after you eat.

Love,
PlusPeace


Wednesday, April 3, 2013

FREE Printable Roundup

I am a big fan of printables - let's be specific - FREE printables.  Lots of blogs offer them (and if I could figure out how to customize my blog with tabs, I would make a whole bunch too) until then, here is my toddler friendly printable round-up!

I love TinyMe, their products are adorable and they add stuff to their print section all the time.  Bear and Nana made the "Color-Me-In" stick puppets a few weeks ago.  Some require a color printer and some do not. Free Printables Here

image from TinyMe

Spoonful has lots of creative ideas for little kiddos.  Check out their "create" tab for fun activities.  These are their Top 25 Printable Mazes & Games. Free Printables Here

image from Spoonful

Babble has it goin on - I could get lost on this site for hours but stumbled on these 10 Fabulous & Free Printables.  These require paper and little imaginations. Free Printables Here

image from Babble

Mr. Printables is the mother-load.  There is everything from Robot Masks to Snake Puppets and flash cards.  All is well designed and eye catching. Free Printables Here

image from MrPrintables

I definitely need to get my printer up and going again :)

Love,
PlusPeace


Wednesday, February 20, 2013

I Spy & Something for Mum and Dad

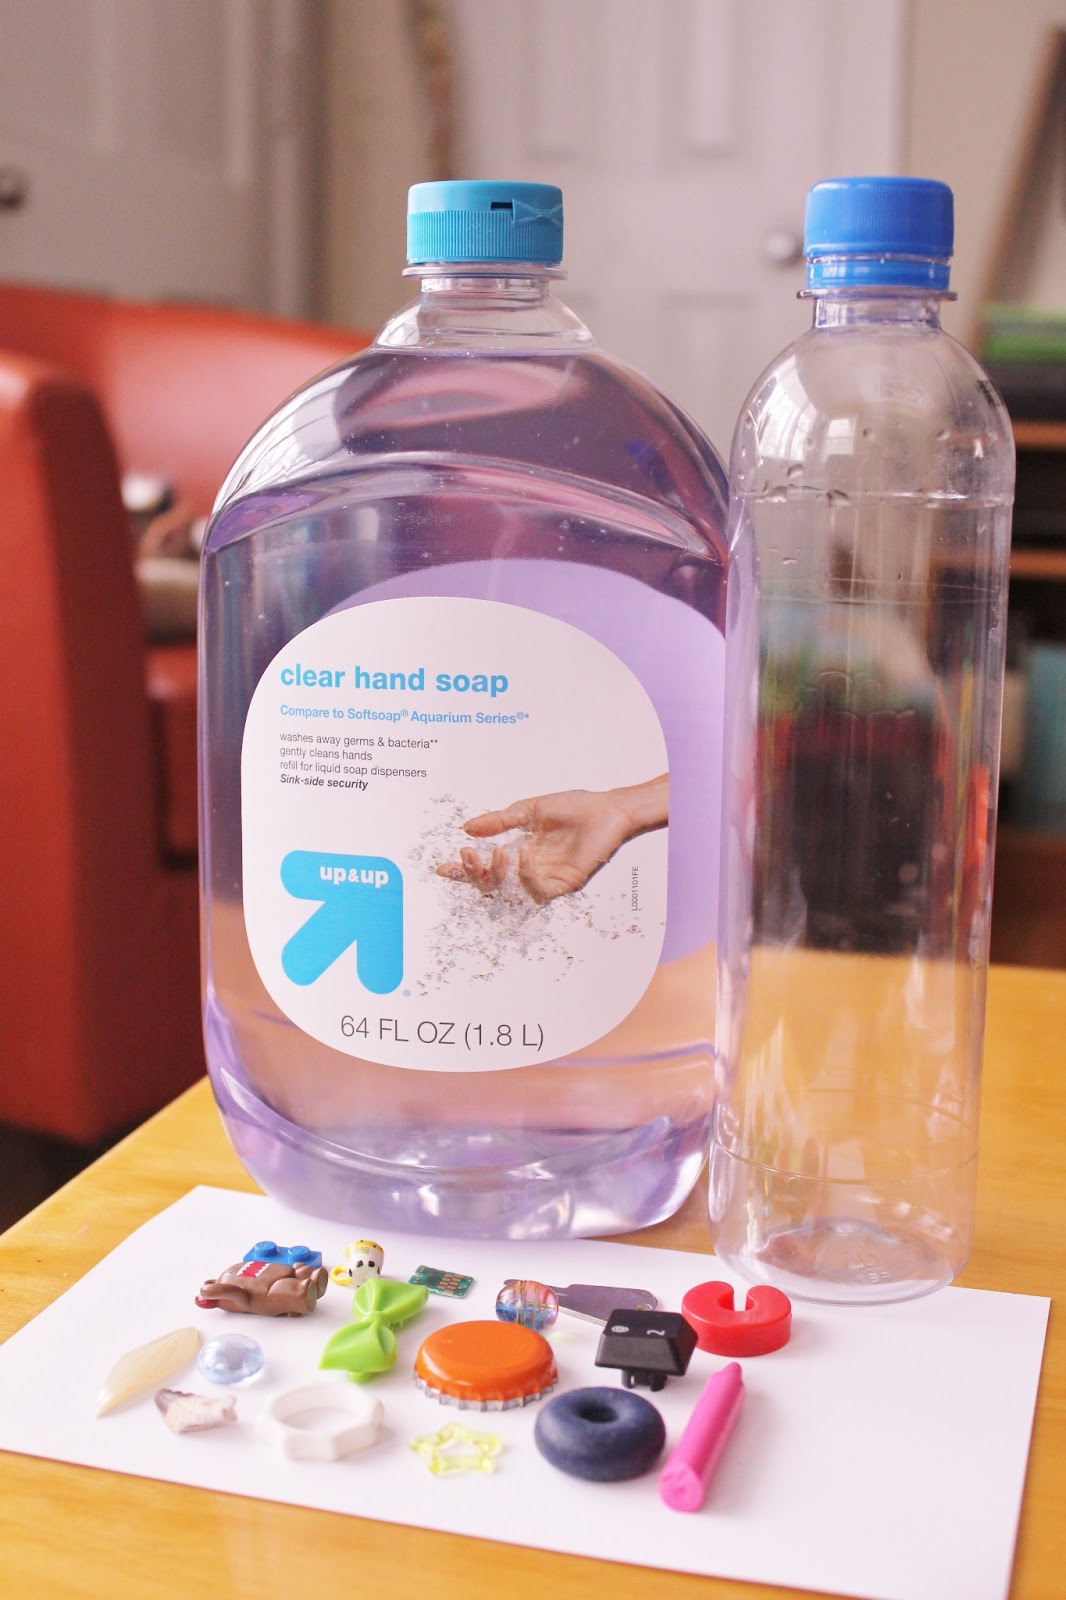
SUPER Easy project for a weekend - I spy bottle!!


I had a cool water bottle kicking around the floor of my car it was a $1 bottle of water from Walgreens so we used that.  Any smooth water bottle will do fine.  I got a half gallon of CLEAR hand soap from target for $3.49 and we rounded up all the knick-knacks and brightly colored choking hazards around the house (crayons, a plastic grenade, a mini teacup, some beads, etc..) OH and glitter...nothing is fun without glitter right?


I had Bear drop all the little pieces into the bottle then we poured the glitter and soap in together. Fill almost to the brim - leave about 1" of air. Squirt some super glue around the sides of the inside of the cap and twist on as tight as you can.  There will be a bunch of bubbles but it will be more fun in an hour or so when everything settles.


Good for finding trinkets and good for learning about what floats vs what sinks :)

For Mum & Dad:  It's hard to time find for our partners these days (gonna keep it g) if anyone wants to spice things up try out spicysubscriptions.com for a month (I'll let ya'll know if it's worth it, we'll get our first box next month) but if you want to try use my code: Holly3485

Love,
PlusPeace

Monday, February 18, 2013

Glow Bath

We went to Target over the weekend and grabbed a tube of 15 glow bracelets from the $1 bin (good deal).  I sort of had the idea of what I was going to do with them but it ended up being 10x more fun than I thought.

The first night we only put 5 in the tub and it was not super interesting.  Tonight we put in a whole bunch and connected them to line the whole bath.

I highly recommend this!


Then we decided to have some fun with the shutter speed...


...and then the fun continued into the bedroom...


Keep in mind these have small parts and although they are not easy to break, they can.  Do not leave your kid unattended in the bath with these - or in general don't leave your kid alone in a tub of water :)  If one does break, I would call poison control just in case but my friend's little brother broke one in his mouth and poison control told us that they just taste really bad and wont harm you (but don't take my word for it).

We also like to add the sesame street water dyes to the tub at night.  A can of 25 was only $3.49 at RiteAid.

Love,
PlusPeace

Wednesday, February 6, 2013

FREE Printable Valentines

We made some Valentine's to share!

I got the background from NASA's picture a day page and made a 'galaxy' background.  Then found some fun fonts for the back and left a blank space for your kiddo's name!

Since we wanted to give them a personal touch, I had used paint chips and a star punch to punch out a ton of stars and Bear glued them on.  You could also glue hearts, planets, glitter, etc to make them super pretty and personal!

Here are Bear's out to dry...


Go to THIS LINK to download and print yours.


 There are two pages, if your home printer does not print two sided print one side, flip and print the other.  I have included gray marks that show where to cut.

Love,
PlusPeace

Monday, January 14, 2013

Making Toddler Clothes

I am just going to touch on the subject right now because I am short on time but want to share my latest DIY endeavor and provide some resources for anyone interested.

For my birthday my loving man got me one of these...


YAY - I recently came to the realization that come the spring out back-log of kids clothing will be depleated and we'll have nothing left that fits for summer.  I spent some time looking at second-hand clothing in bulk (people selling backs) but everyone wanted anywhere from $35-55 and that is just not do-able right now.  So I will be making all of Bear's clothes!  Well a good chunk of them at least.  

Although I am still working out the kinks on the neck of my shirts (I don't have a serger which makes this WAY easier) I wanted to share where I started.  

I made my own patterns with the help of made's blog tutorial on drafting patterns: HERE

And used a combination of her tutorials for PANTS and SHIRTS to create this outfit (keep in mind I will be re-sewing the neckline to fit better)


For the shirt, I made one with the envelope neck as shown in the tutorial on made but it fell off his skinny little shoulder so I pulled up THIS tutorial from CraftStylish.com to attempt the neckline. 

I was very surprised at the results, I thought I would have trouble making the sleeves but it was so easy! I tried two different methods and both worked great.

Love,
PlusPeace


Friday, January 4, 2013

Now on Pinterest

Nifty Things for the Thrifty Mom now has Pinterest!!

Follow my boards @ThriftyNiftyMum for tutorials, kid fashion, little crafts and neat articles!

Looking forward to seeing you all there!


Love,
PlusPeace


Tuesday, January 1, 2013

Easy-Peasy Hand Warmers

Awesome gift for any winter holiday, birthday or just because - hand warmers! SOO easy.  I used the left over fabric from some Monster Sillybets and Bear's pretend camp fire.


What you need:

Some fleece or flannel fabric pieces (for each you need 2 - 4" x 4" pieces)
Scissors - good ones help
Sewing machine OR patience to sew by hand
Needle & Thread
Uncooked rice (NOT Instant)

How to:
Put two pieces of fabric together and cut out your shape of choice. Sew about 1/4" from the edge all the way around leaving a 1" opening to fill. Use a funnel, or a steady hand to fill the "pouch" 3/4 full. Sew the opening closed by hand.  I went back and trimmed off some of the excess so I had a nice even edge (not pictured).  If you do not want any fabric on the outside then flip inside out before filling.

Bear had fun piling these into the back of his truck so I plan to make him some rice bags later for playing.

If you feel fancy, you can use oils to give your warmers a cozy smell (rose, lavender, etc) I chose not to because I was feeling lazy. You can also make larger ones as heating packs for cramps, aches and pains - good mothers' day gift!

Love,
PlusPeace

Sunday, December 30, 2012

Idea of the Day + Potty Training Update

We started potty training Saturday.  Bear did not wear clothes ALL DAY because we didnt have to go anywhere.  He used the potty 5 times and had 5 accidents.  One accident was because he wasn't really sure what to do about poop and the others were because I put "big boy" pants on him before he was ready and he didnt really understand that they didn't work like diapers.

Today (Sunday) we did MUCH better.  He wore a diaper last night and for nap today and went pants-less the rest of the day with NO accidents until right before bed (he got distracted). Hooray! Unfortunately I don't have tomorrow off so I am hoping he can go most of the day in big boy pants.  We shall see!

I did NOT do any "rewards" system as some have recommended and like I had originally planned for two reasons; firstly, the rewards (stickers, snacks, etc) have only caused issues, meltdowns and stress in the past and secondly, I had an internal battle with myself on whether or now thats how I really want to train him, I don't want him to expect rewards, especially since he will be at school or with Nana for other parts of this process.

By day two I, as a parent, learned that sticking with it is KEY! I was afraid I would give in and give him pants but after telling him he doesn't need them only twice, he gave up and went with it only to improve the following day.  This was a GREAT bonding weekend, because I had to be 100% focused on Bear and constantly asking him if he had to use the potty we came up with great indoor games and got lots of cleaning done together. He actually HELPED pick up his toys!

During a watercolor excursion we decided to face paint.  I wanted to share this one specifically because it is something you and your kids can do together any day at any time - only takes water and non-toxic watercolors (most are) and a paintbrush or two.  Also really great that is washes right off and it's not somehting your child gets to do alot.  We first did a hungry caterpillar on his cheek which changed into a "war paint" of sorts on the other side, arms and belly.  Threw him in the tub and  - all gone!


Love,
PlusPeace

Sunday, December 23, 2012

The Two Hour Teepee Tutorial - DIY

I do most things last minute, especially this Christmas! Bear has had a lingering cold since early November.  He spiked a fever on Tuesday and I took him to emergency walk in clinic to see what was up.  They told me he was just "catching the same cold over and over", which left me feeling uneasy since he had a fever and green boogies ((infection).  I called my pediatrician on Thursday because he was so sick he couldn't even play and we went in on Friday morning to find out he has an ear infection, strep throat AND viral pneumonia. He's been on antibiotics for three days now and is back to himself! YAY!

Anyways - I have been planning on making Bear a teepee for Christmas since we moved into our new house in October.  I put it off until this morning - yes, less than 48 hours before Christmas.  Everything cost me less than $13 and only took a 2 hour assembly.

After much research online (well pinterest) it looked like most people had this as a "center piece" for a room.  We (like most) just dont have that kind of space to dedicate so this is made to fit into a corner but the directions can be altered to accommodate a larger teepee.  Mine also collapses VERY EASILY to fit into a corner and sets up again just as easy.

Supplies:
1 - 6 x 9 Canvas Drop Cloth - $10 Home Depot
2 - 1" x 3" x 8' Strapping - $1.34 each Home Depot
Good cutting scissors
Sewing Machine
Thread (I used what was in the sewing box - half is sewn in orange, half in red)
Tape measure
Straight edge (you can use the strapping)
Pencil
Table saw - OR have one of the lads at Home Depot cut it or you

How To:
Step 1 (Strapping)

Cut the strapping the long way so your pieces are now 1" x 1.5" x 8'  I wanted my teepee only 6' tall so I just the strapping again to be roughly 6'  To looks a little more realistic they are all a few inches off.  This way the top sticks are uneven.

Step 2 (Canvas)

A - Lay out your canvas. It will be wrinkly, if you want your teepee perfect then iron it first, I was not about to spend 30 minutes ironing a 6 x 9 piece of canvas.


B - Mark the center of the canvas on the top and bottom.
C - Measure 3' from each end and mark again.
D - Using your straight edge or a piece of strapping put one end at the center mark and the other at one of the 3' marks and draw your first angle
E - Using the center mark make your second angle in the other direction.
F - On the opposite end from your point, use your edge to go from the 3' mark to 3' mark and do the same on the opposite side
You should now have three triangle, the center one going to opposite direction from the other two.
G - Cut along your lines (4 cuts total)


Step 3 (Straps)

A - Using one of the extra edge pieces, cut out 9 8" x 4" pieces of canvas.  These will be used to hold the wood strapping to your canvas.
B - Fold in both sides 1/2" (length wise see below) and stitch


C - Do this for all 9 straps

Step 4 (Sewing your tent)

A - Pin all of your triangles together leaving 1" to sew. 
B - fold your straps in half and tuck into the seams about 2' apart, you will want one at the bottom one half way and one 6-8" from the top
C - Pin them in place (unfortunately I dont have a picture of all my pins but you can reference the image of the straps sewn in place)
D - Sew along where your pins are leaving 1/2 - 1" from the edge
Note: Leave about 4" unsewn from the top (narrow end of teepee) to allow room for the sticks
E - Do this for all 3 sides


Step 5 (Finishing up)

A - Turn your tent right side out (so the straps are inside)
B - Run your strapping though the loops (work from the wide end)
This step can be a bit frustrating since it gets all tangles up but go slowly and dont worry about imperfections
C - Cut a long 2.5' piece of canvas to tie the top of your teepee in place.
D - Pinch small 1/8" holes in to top of each triangle
E - Stand up your teepee and run the long piece of canvas through the holes and wrap it around the wood strapping until it holds and tie tightly.
D - Cut a slit in the center on one of the triangles until you are happy with the size of the door.


DONE!
You can decorate with paint or ribbon or other kinds of fabric.  I left mine very simple.  For tiebacks on the door i just used more canvas but think ribbon would look nice.  Please leave questions in the comments section if you have any!!


To store it, just grab it from the top and it collapses to fit in the corner like so...


Setup after the initial frustrating trying to tie it part is very easy!  The whole process with no directions took me about 2 hours (during Bear's nap).  The shape of this (triangle base) is made to fit into a corner but if you use the same directions and make more triangles to sew together, you can use more poles and have a larger teepee

Best of luck and Merry Christmas!

PlusPeace


Wednesday, December 19, 2012

Custom Wrapping Paper - 8 Bit Dinos

I made this super awesome wrapping paper for Bear at work and had a bunch of fun wrapping some gifts last night - check it out!


Also I found a great Men's gift for Tim for Christmas.  I am not sure if it will arrive in time but I got him a subscription to DollarShaveClub So he gets razors every month (I did the math and this is much cheaper) Be careful, you DO have to cancel or you get billed monthly.  Our plan is to do a few months and then we'll have enough to last (6 blade razors).  Also you get $1 cash back for going through Ebates!

I hope he loves it!!

PlusPeace

Monday, December 17, 2012

Advent Calendar: Day 15

So Advent Day # 15 was another fantastic one - while Mommy and Daddy had a night on the town and attended a few Christmas parties, Bear and Nana went on the Polar Express!!


We watched the movie twice before he went and he had so much fun drinking coco, riding the train and seeing Santa! He even held the bell up to his ear and repeatedly said "I believe!"


I was sad I didn't get to go but very happy he had a great time :)

Love,
PlusPeace

Don't forget Ebates for your last minute shopping!! My next check will be $53 (Just use my button below)

Ebates Coupons and Cash Back

Saturday, November 24, 2012

Painted Birch Kids Room - DIY

Over Thanksgiving I came accross this pin which lead to a conversation with my sister about just painting the birth trees right on Bear's wall rather than dreaming of spending $120+ on them.  I figured I would never ever be able to pull it off so didn't put much more thought into it.  Then this afternoon we went to Home Depot and I decided to just do it.  I am not a pro-painter but I they came out AMAZING!  Bear loves his room!  Before bed tonight we put on his stars night light (projects stars on the ceiling) and lay next to the trees under the stars for a bedtime story, magical.

Painted Birch Tutorial

Materials:
Scotch Masking tape 3/4 inch thick will do ($1.99) - I did NOT use the blue tape because I've found that it doesn't stick well to our walls. The scotch masking tape was significantly cheaper and didn't peel off any of the paint.
Gliden Flat Matte paint ($9.49) - I just got the small container in the trim aisle. These trees will not work on white walls unless you get a darker color paint and do reverse.
Painting Sponge OR Edge Brush ($2.50-4.99) - The edge brush is not a paint brush it looks like a flat roller piece on an orange handle. I used this like a sponge since I didnt have one so a sponge would do fine.

How-to:
Step 1 - Prep your walls. Wipe them down with a dry cloth if fairly clean and if your walls have not recently been painted or are particularly dirty use warm water and let dry.  Plan how many trees you want and where.

Step 2 - Make your outlines.  Starting from the bottom of the wall, tape the base of your tree.  The great things about birch trees is they are very hard to mess up.  They have not many branches and, for the most part, are straight. To make them look like birch, I ripped small strips of tape and placed them randomly over the center and outlines of the trees.  The "knots" in the tree I just made with tiny pieces of tape in a circle.  Work ONE tree at a time so you have a better concept of the amount of space you end up with.


Step 3 - Paint! Sponge paint the inside of your tree in a fairly thin layer but make sure you are covering over the wall color.  Work from the top down and then repeat the process so the color is nice and bright.  The texture from using a sponge is OK because trees have texture.


Step 4 - Peel!  Peel off the tape from top to bottom while paint is still wet.  Go slow and some smudges are OK.  Dont forget all the bits in the middle that were painted over, you may have to gently scratch these with your nail to get a piece up to peel.


Voila!  I only did one wall with three trees today and plan to do the opposite wall tomorrow - and will post the pics :)

Any questions, just comment!

Love,
PlusPeace

Sunday, November 18, 2012

Quick Craft Sunday

In honor of Thanksgiving and our (small but still notable) Native American heritage we decided to make brightly colored arrows for Bear's room.  I am working on making his room with a nature inspired theme and he finally got a "big boy bed" this weekend (great find from Casa.com  I ended up getting $70 off in savings and coupons) so we did a celebration craft.

This craft was sparked by these  but mine are WAY more simple.

You will need:
[2] 4' Dowels I used 1/4" thick ones for .88 at homedepot
[6] Different Colors of thin craft foam I got a big pack of small sheets for $1 at dollar tree
Kids craft paint in a variety of colors $1 at dollar tree
Exacto-knife or hand saw
Paint Brush another $1 for the multipack at dollar tree
Sandpaper
Glue-gun with clear glue

How to:
Cut each of the dowels to be 1.33' long and sand the cut ends to be rounded.  Cut your foam into 3-4" half feathers (a half oval is OK) you will need 3 half feathers per arrow.  Make fringe on the rounded edge of each of the feathers.

Your or your kiddo can paint the dowels. We made the rounded tips grey and the base of each yellow with various colored bands in random spots.  Once the paint is try, hot glue the straight edge of the feathers to the non-pointed end of the arrows.  Glue 3 one each at 90 degree angles from eachother.  You can put 4 on each but I left one side "flat" because I intend to hang them on the wall somehow.


I ended up doing all the work on these and Bear pretends they are flowers or rockets but they are still tons of fun!!  I cant figure out a good way to hang them because for some reason the 3M stickies dont work well on Bear's walls. 

Enjoy :)
PlusPeace

Wednesday, October 24, 2012

The Occupied Toddler

I often like to include Bear on what I make in the kitchen but sometimes, it's just not that interesting or not age appropriate.  I saw a pin (I wish I could find it) for putting paint in a bag and letting them play with it on the counter.  Since Bear is smart and a "picker", as in he picks at things, I had to re-enforce the bag.


I used:
Quart size double zip baggie
Green crayola finger paint (the key here is water based)
Clear packing tape

I put the paint in the baggies, got ALL the air out and zipped it shut.  Taped it on the top and bottom to the counter (horizontal) and then used smaller strips to cover it (vertical).  There is NO WAY that paint will get out of there and it entertained him for a full 15 minutes before moving on to another task.

I left it on the counter (been there 3 days) and he has played with it a few minutes here and there each day.

Definitely a fun, easy activity!

Love,
PlusPeace

Friday, September 28, 2012

Coloring Keepsake

I started this project for Bear


It is a coloring book with him and all of his friends and family.  I have been doing it on the Wacom tablet I use at work (since mine is not set up yet) and putting the original picture in photoshop in black and white and then tracing on another layer.  It's tedious but is coming along super.  I am hoping to have 10-15 pages done and plan to give it as a Christmas present.

I also thought this would make a really neat Birthday card.  Do a coloring picture of the birthday boy/girl on the front of the card and give a few crayons inside.

If you don't have the tools I use for the computer you can also just lay a blank sheet of paper over a blown up photograph and trace with a thin black marker.

Enjoy!
PlusPeace

Update 10/2/12 : I do know there is an effect in photoshop that does something similar but decided that there was too much cleanup involved since I didnt want the background, only the basic outline of the kids. If you do not have a wacom tablet and want to do this use the effect instead :)

Thursday, August 16, 2012

Silly Things My Kid Says: FREE Printable

I've seen little books made of quotes from small kids. As Bear get's more verbal and is starting to make complete sentences, I decided I want to start making a book myself.

This morning while I am getting dressed and Bear is stealing my clothes:
Bear (bra in hand)
Me: Bear I need that please
Bear: No I need it!
Me: But Bear, you don't have boobies.
Bear: Yes I do. See? (lifts up shirt)
Me: But Mommy has bigger boobies.
Bear: Me too. See? (pointing at nipples)

ahhh - so priceless!

Well anyways, I have made these to share:


You can download them HERE!

You can punch a hole in the corner and keep them together with a binder ring :)

Love,
PlusPeace

Wednesday, August 8, 2012

My OH My

Has life gotten the best of me!!  Blogging has been scarce lately (I blame pinterest and sad efforts to boost my resume). We are preparing to buy a new house and by preparing I mean we have a closing date approaching quickly and we haven't done a darn thing! I am so very excited for Bear to finally have his own room, but I am also nervous about how he is going to react to such a big change. We are now packed in like sardines in a one bedroom city apartment with a efficiency kitchen (not so efficient I might add) going o a three bedroom ranch with fenced in yard (woohoo). I hope he will adjust quickly :)

Has anyone had any experience on moving a toddler and a little about what to expect?

Now for a little about you and less about me: I;ve been a big fan of hand me downs and kid fashion lately and wanted to share a few fun tutorials on making ordinary kids clothes a little more unique!

Shrinky Dink Buttons & Shoe Labels: Replace the buttons on kids jackets with big buttons made from shrinky dink paper! You can make them any color, pattern or draw letters on them!! Also if you've ever noticed on sketchers where you thread the lace in first they have a little plastic piece the lace goes through with an "s" (if you dont know what I am talking about I'm sorry :( ) make one of those for your kids laces with their name :)  Button Tutorial HERE

Ribbon, ribbon and more ribbon: use ribbon as laces, hand made hair bows, sew them onto coat seams or cuffs of pants. This may sound girly but truck ribbon or dark solids look cute. Also for a "suspenders" look, sew straight ribbon onto a pain tshirt OR just make suspenders!

Nothing a little dye cant fix: I never really think of dying my own clothes but it's so simple and easy to do! Dye denim for cool colored kids pants or use bleach for an "acid wash" look.

Bleach: Make designs on denim or dark colored clothing with bleach pens, then rinse and wash - comes out pretty cool :)

Sweater Vest from an Old Sweater - tutorial HERE

Make your own kids pants - tutorial HERE

How do you upcycle??

PlusPeace