I do most things last minute, especially this Christmas! Bear has had a lingering cold since early November. He spiked a fever on Tuesday and I took him to emergency walk in clinic to see what was up. They told me he was just "catching the same cold over and over", which left me feeling uneasy since he had a fever and green boogies ((infection). I called my pediatrician on Thursday because he was so sick he couldn't even play and we went in on Friday morning to find out he has an ear infection, strep throat AND viral pneumonia. He's been on antibiotics for three days now and is back to himself! YAY!
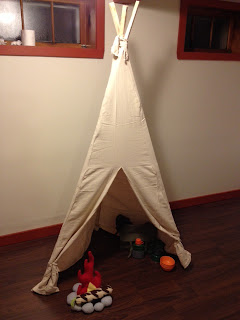
Anyways - I have been planning on making Bear a teepee for Christmas since we moved into our new house in October. I put it off until this morning - yes, less than 48 hours before Christmas. Everything cost me less than $13 and only took a 2 hour assembly.
After much research online (well pinterest) it looked like most people had this as a "center piece" for a room. We (like most) just dont have that kind of space to dedicate so this is made to fit into a corner but the directions can be altered to accommodate a larger teepee. Mine also collapses VERY EASILY to fit into a corner and sets up again just as easy.
Supplies:
1 - 6 x 9 Canvas Drop Cloth - $10 Home Depot
2 - 1" x 3" x 8' Strapping - $1.34 each Home Depot
Good cutting scissors
Sewing Machine
Thread (I used what was in the sewing box - half is sewn in orange, half in red)
Tape measure
Straight edge (you can use the strapping)
Pencil
Table saw - OR have one of the lads at Home Depot cut it or you
How To:
Step 1 (Strapping)
Cut the strapping the long way so your pieces are now 1" x 1.5" x 8' I wanted my teepee only 6' tall so I just the strapping again to be roughly 6' To looks a little more realistic they are all a few inches off. This way the top sticks are uneven.
Step 2 (Canvas)
A - Lay out your canvas. It will be wrinkly, if you want your teepee perfect then iron it first, I was not about to spend 30 minutes ironing a 6 x 9 piece of canvas.
B - Mark the center of the canvas on the top and bottom.
C - Measure 3' from each end and mark again.
D - Using your straight edge or a piece of strapping put one end at the center mark and the other at one of the 3' marks and draw your first angle
E - Using the center mark make your second angle in the other direction.
F - On the opposite end from your point, use your edge to go from the 3' mark to 3' mark and do the same on the opposite side
You should now have three triangle, the center one going to opposite direction from the other two.
G - Cut along your lines (4 cuts total)
Step 3 (Straps)
A - Using one of the extra edge pieces, cut out 9 8" x 4" pieces of canvas. These will be used to hold the wood strapping to your canvas.
B - Fold in both sides 1/2" (length wise see below) and stitch
C - Do this for all 9 straps
Step 4 (Sewing your tent)
A - Pin all of your triangles together leaving 1" to sew.
B - fold your straps in half and tuck into the seams about 2' apart, you will want one at the bottom one half way and one 6-8" from the top
C - Pin them in place (unfortunately I dont have a picture of all my pins but you can reference the image of the straps sewn in place)
D - Sew along where your pins are leaving 1/2 - 1" from the edge
Note: Leave about 4" unsewn from the top (narrow end of teepee) to allow room for the sticks
E - Do this for all 3 sides
Step 5 (Finishing up)
A - Turn your tent right side out (so the straps are inside)
B - Run your strapping though the loops (work from the wide end)
This step can be a bit frustrating since it gets all tangles up but go slowly and dont worry about imperfections
C - Cut a long 2.5' piece of canvas to tie the top of your teepee in place.
D - Pinch small 1/8" holes in to top of each triangle
E - Stand up your teepee and run the long piece of canvas through the holes and wrap it around the wood strapping until it holds and tie tightly.
D - Cut a slit in the center on one of the triangles until you are happy with the size of the door.
DONE!
You can decorate with paint or ribbon or other kinds of fabric. I left mine very simple. For tiebacks on the door i just used more canvas but think ribbon would look nice. Please leave questions in the comments section if you have any!!
To store it, just grab it from the top and it collapses to fit in the corner like so...
Setup after the initial frustrating trying to tie it part is very easy! The whole process with no directions took me about 2 hours (during Bear's nap). The shape of this (triangle base) is made to fit into a corner but if you use the same directions and make more triangles to sew together, you can use more poles and have a larger teepee
Best of luck and Merry Christmas!
PlusPeace


.JPG)


.JPG)
.JPG)


